RetopoGEN User Guide
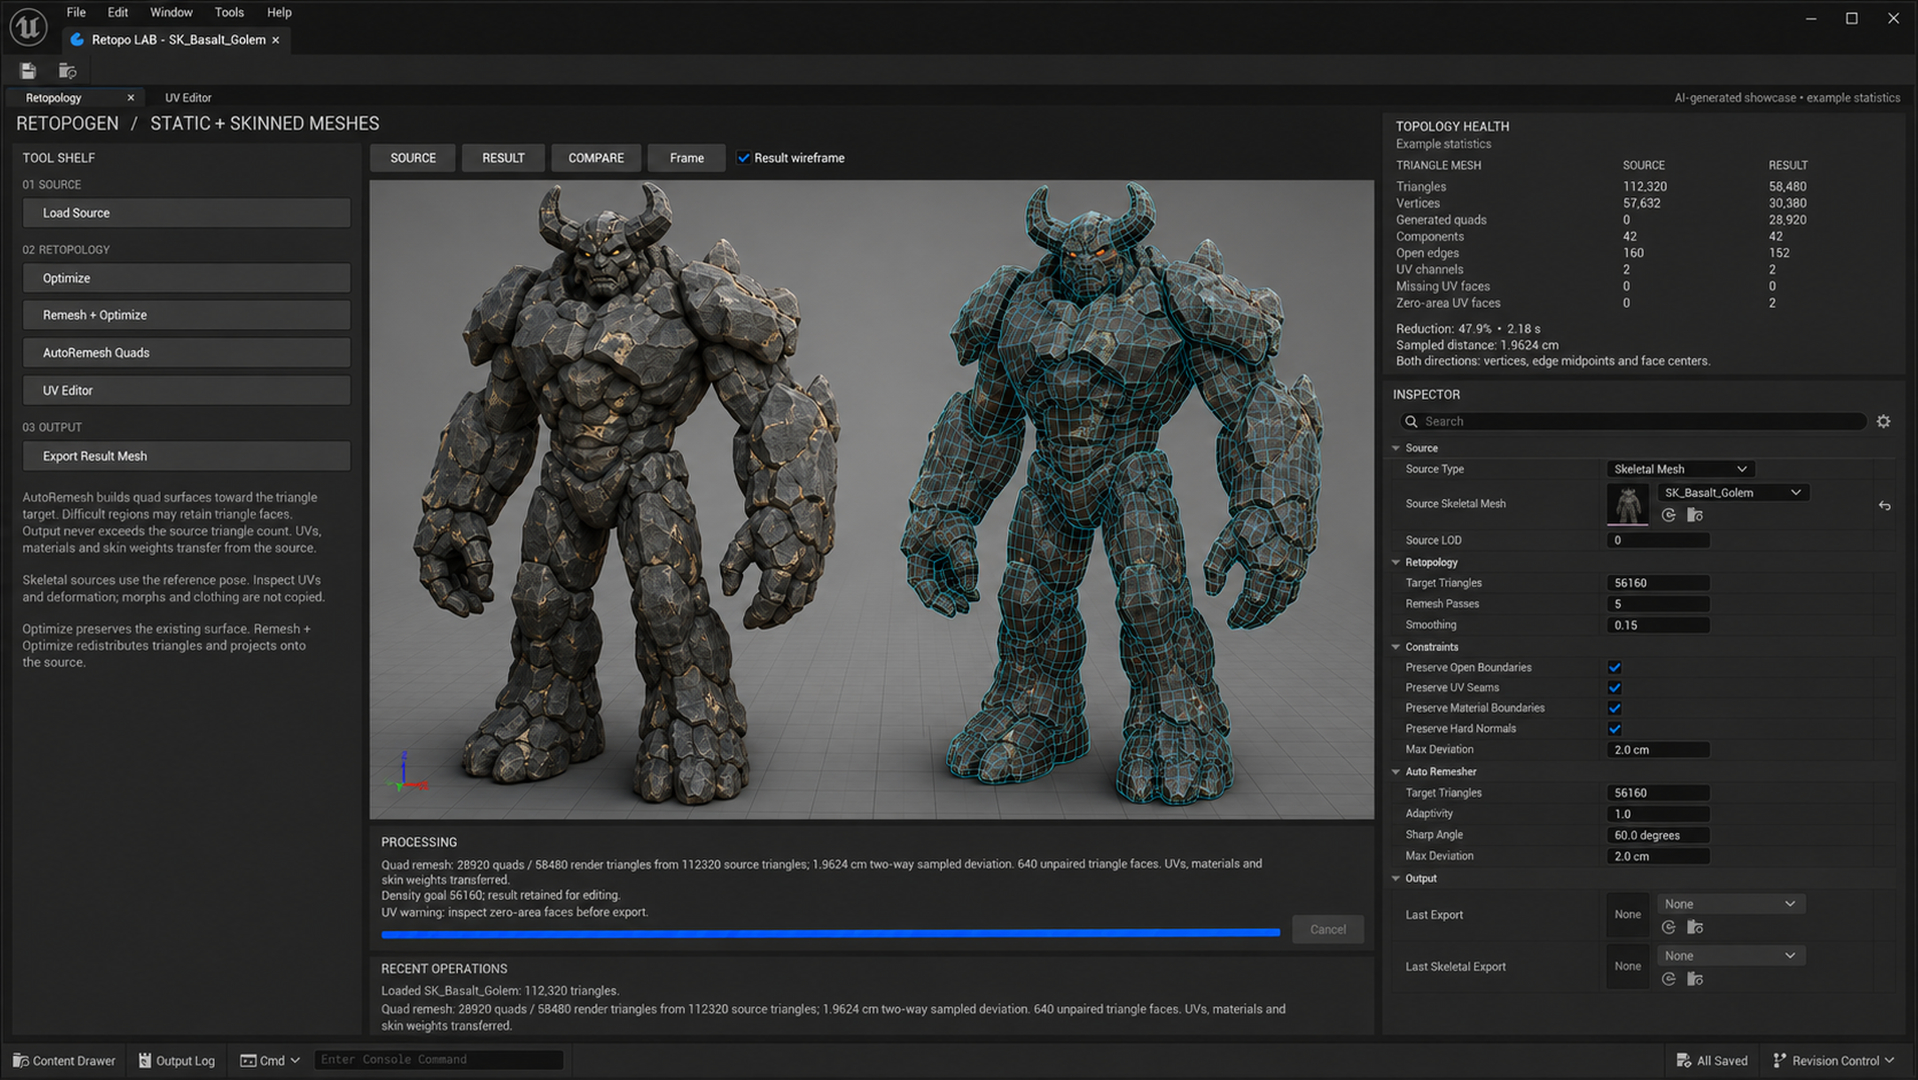
Turn a detailed mesh into a lighter mesh, check it beside the original, and save the result as a new Unreal asset.
RetopoGEN works with Static Meshes such as props and scenery, and Skeletal Meshes such as animated characters and creatures. Its workspace is called Retopo LAB.
Retopology means changing the small faces that make up a model. Reducing those faces can make a model less expensive to render. The aim is to use fewer faces while keeping the shape and appearance you need.
Your original mesh stays unchanged. You work on a preview and choose when to export a new asset. Processing happens locally on your computer.
Contents
- Your first retopology: start here
- Enable the plugin and open a mesh
- Find your way around Retopo LAB
- Choose a retopology tool
- Adjust the settings
- Check the result
- Edit UVs and keep textures looking right
- Export and use your new mesh
- Work with characters and creatures
- Save settings for another session
- Troubleshooting
Your first retopology: start here
For your first attempt, choose a mesh that already looks correct in Unreal.
- Find the mesh in the Content Browser or Content Drawer.
- Right-click that one mesh and choose Edit in Retopo LAB....
- Wait for the model to appear. It loads automatically; you do not need to click Load Source.
- Leave the settings at their defaults. The triangle target starts at half of the loaded mesh's triangle count.
- Click AutoRemesh Quads on the left.
- Wait for processing to finish, then click COMPARE above the preview.
- Compare the shape of the original and the result. Turn off Result wireframe to check the materials and textures.
- If the result looks good, click Export Result Mesh.
- Open Content > HKH > RetopoGEN in the Content Browser. Your new mesh is saved there. Double-click it to inspect it in Unreal's mesh editor.
Example: a source with 40,000 triangles starts with a target of 20,000. This is a starting goal, not a guaranteed final count. Check the actual result in Topology Health.
If the result loses too much detail, increase Auto Remesher > Target Triangles and click AutoRemesh Quads again. Try a few counts before choosing the version you want to keep.
Enable the plugin and open a mesh
Enable RetopoGEN
With the plugin installed in your Unreal project, open Edit > Plugins, search for RetopoGEN, and enable [HKH] RetopoGEN. Restart the Editor if prompted. This version targets Unreal Engine 5.8 on Windows.
You do not need VellForge to use RetopoGEN.
Open from the Content Browser
Select one Static Mesh or Skeletal Mesh asset, right-click it, and choose Edit in Retopo LAB.... Use the mesh asset itself, rather than a material, Skeleton asset, Blueprint or object selected in the level.
Opening the same mesh again brings its existing Retopo LAB session forward.
Open an empty workspace
Choose Window > Retopo LAB. In the Inspector, expand Source:
- Set Source Type to Static Mesh or Skeletal Mesh.
- Choose the asset in Source Mesh or Source Skeletal Mesh.
- Leave Source LOD at 0 for the first attempt.
An LOD is a version of a mesh with a different level of detail. LOD 0 is normally the most detailed version. Choose another LOD only if your source asset already has it.
Selecting a source or changing its LOD loads it automatically. Load Source reloads the current selection. Every successful load resets both triangle targets to half of that source LOD's triangle count, so set your preferred target after loading.
What can I load?
The selected source LOD must contain 1 to 2,000,000 triangles and editable mesh data. Targets can be set from 1 to 1,000,000 triangles.
Import external model files into Unreal first. Retopo LAB opens Unreal mesh assets; it does not open an FBX or OBJ file directly. For a Nanite asset, it uses the editable source LOD, not Nanite's internal rendering geometry.
Meshes with open edges or holes are supported. RetopoGEN can automatically repair some connectivity problems on its working copy. It does not fill the model's holes.
Find your way around Retopo LAB
| Area or control | What it does |
|---|---|
| Tool Shelf on the left | Load a source, run a tool, open the UV Editor or export. |
| Inspector on the right | Choose the source and change the settings for your next attempt. |
| SOURCE | Show the original loaded mesh. |
| RESULT | Show the current working result. |
| COMPARE | Show source and result beside each other. |
| Frame | Bring the displayed meshes back into view. Useful if you lose them while navigating. |
| Result wireframe | Show the result's face edges over its shaded surface. |
| Topology Health | Compare the source and result counts and inspect possible problems. |
| Processing | Read progress, completion messages and warnings. Cancel requests that the current operation stop. |
| Recent Operations | Read recent status messages. This is a message history, not a collection of saved mesh versions. |
Changing settings means you must run the tool again before exporting. A mesh may still be visible from a previous attempt, but it is not a current result for the new settings.
Each retopology tool starts from the loaded source, rather than repeatedly reducing the previous result. Finish retopology before editing UVs. Running another retopology operation replaces the working result and its UV edits; export a version first if you want to keep it.
Choose a retopology tool
You only need to run one of these tools for an attempt. They are alternatives, not three required steps.
| Tool | Use it when... | Settings to use |
|---|---|---|
| AutoRemesh Quads | You want a layout of four-sided faces, with a lower triangle count where possible. | Auto Remesher |
| Optimize | You mainly want fewer triangles while keeping the existing surface and protected details. | Retopology and Constraints |
| Remesh + Optimize | You want to redistribute uneven triangles as well as reduce their count. | Retopology and Constraints |
A quad is a face with four sides. Unreal still renders it as two triangles. For example, 5,000 quads use 10,000 render triangles if there are no additional triangle faces. Target Triangles always means triangles, not quads.
AutoRemesh Quads may keep some triangle faces in difficult regions. It will not increase the output above the loaded source triangle count, but it may keep more triangles than your requested target to retain a usable shape. It does not guarantee an all-quad result or the carefully arranged joint loops of a manually retopologized character.
Adjust the settings
AutoRemesh Quads settings
Expand Auto Remesher in the Inspector.
| Setting | Starting value | How to use it |
|---|---|---|
| Target Triangles | Half the loaded source count | Lower it for a lighter model. Raise it if important shapes become rough, thin parts disappear or details look distorted. |
| Adaptivity | 1.0 | Higher values favor more detail in curved areas. Lower values favor more even spacing. Leave it at 1.0 for your first attempt. |
| Sharp Angle | 60 degrees | Helps protect sharp corners during smoothing. A lower angle treats more changes in surface direction as sharp; a higher angle allows more of them to relax. |
| Max Deviation | 2.0 cm | Sets the desired closeness to the original surface. If the result exceeds this goal, the tool reports a warning and keeps the result available for inspection. |
A small object may need a smaller deviation goal than a large statue. Setting Max Deviation to 0 disables its distance warning; it does not improve the mesh.
Optimize and Remesh + Optimize settings
For these two tools, use Target Triangles under Retopology, not the one under Auto Remesher.
| Setting | Starting value | How to use it |
|---|---|---|
| Target Triangles | Half the loaded source count | Choose how many triangles you would like to keep. Protected details may prevent reaching this number. |
| Remesh Passes | 5 | Applies to Remesh + Optimize. More passes give the tool more opportunities to rearrange triangles and take longer. |
| Smoothing | 0.15 | Applies to Remesh + Optimize. Increase it for stronger smoothing, or reduce it when small details become too soft. |
| Max Deviation, under Constraints | 2.0 cm | Limits allowed surface change. Unlike the quad tool's warning goal, these tools can reject a result that exceeds this limit. A value of 0 disables the limit. |
Leave the four Constraints checkboxes enabled at first:
| Checkbox | What it protects |
|---|---|
| Preserve Open Boundaries | The edges around openings and the outside edges of a sheet-like surface. |
| Preserve UV Seams | Cuts in the texture layout, helping keep texture boundaries in place. |
| Preserve Material Boundaries | Borders between faces using different material slots. |
| Preserve Hard Normals | Sharp shading boundaries, such as the edges of a box. |
These checkboxes affect Optimize and Remesh + Optimize. AutoRemesh Quads uses its own shape and texture-transfer behavior.
If reduction is very limited, you can try turning off one protection at a time and inspect the change. For example, relaxing hard-normal protection may help a smooth organic model, but may soften the appearance of a mechanical part.
Check the result
Click COMPARE and inspect the model from several angles. Check the outer shape, small openings, thin pieces and material borders. With Result wireframe off, look for stretched textures or unusual shading. With it on, look at the arrangement of faces.
Understand Topology Health
| Readout | What it means |
|---|---|
| Triangles | The actual render triangle count. Compare the RESULT column with SOURCE. |
| Vertices | The points making up the mesh. Fewer points usually accompany fewer faces. |
| Generated quads | Four-sided faces identified in the result. These are already included in the triangle count; do not add the two counts together. |
| Components | Separate connected pieces. A character with separate armor, eyes and teeth can have many pieces. |
| Open edges | Edges around openings. A nonzero count is expected on an intentionally open mesh. |
| UV channels | The number of texture-coordinate layouts on the mesh. |
| Missing UV faces | Faces without a mapping in the first UV channel. Inspect their textures. |
| Zero-area UV faces | Faces whose mapping collapses to a line or point in the first UV channel. They may show stretched or incorrect textures. |
| Reduction | How much the triangle count decreased. A 50% reduction means half the original triangles remain. |
| Sampled distance | An estimate of surface difference in centimeters. Smaller means closer at the checked locations; still inspect the whole model. |
The UV counts do not detect every overlap or texture problem. A warning is a reason to inspect the result, rather than an automatic instruction to discard it.
If the shape looks poor, raise the triangle target and rerun. If the result still has nearly as many triangles as the source, try Optimize, or use a less aggressive target on a mesh with many small separate parts.
Edit UVs and keep textures looking right
UVs tell Unreal which part of a texture belongs on each face. RetopoGEN transfers the source UVs and material assignments to the new mesh. This helps retain the existing look, but a larger new face may cover several old texture or material regions, so the transfer may need adjustment.
You can skip UV editing if the result already looks correct. RetopoGEN does not repaint or rebake your textures. Moving, repacking or unwrapping UVs can change where an existing texture appears on the model.
Apply a UV edit
- Finish your retopology attempt, then click UV Editor on the Tool Shelf.
- Choose the UV channel you want to edit. Channel 0 is commonly used for surface textures; other channels may serve different purposes in your materials.
- Select the faces, edges or UV islands you want to work on. An island is a connected patch of the flattened texture layout.
- Choose a tool and adjust its settings. Use Transform to move, rotate or scale an existing layout. Seam, Split and Sew change where patches separate or join. Unwrap creates a new flattening; Layout packs existing islands; AutoUV unwraps and packs automatically.
- Click Accept to finish a tool that has an Accept button. Then click Apply to send the accepted UV changes back to the RetopoGEN result.
- Close the UV Editor tab to return to retopology and make the Inspector settings editable again.
- Check the textured result, then click Export Result Mesh to save it.
Accept finishes the current UV tool. Apply updates the working result. Export Result Mesh saves the mesh asset. They are separate steps.
UV Apply supports undo and redo while the UV session is open. If a close or export prompt offers Apply / Discard / Cancel, choose Apply to keep pending UV edits, Discard to leave them out, or Cancel to return to editing.
You can also use Retopo LAB just for UV editing: load a source and open UV Editor without running a retopology tool. It creates a working copy for you to edit and export.
Export and use your new mesh
- Check that processing has finished and the displayed result is the version you want.
- Apply any UV changes you want to keep.
- Click Export Result Mesh on the left.
- Wait for the Processing message to confirm that the mesh was saved. The message includes its asset path.
- In the Content Browser, open Content > HKH > RetopoGEN. The path shown in messages as
/Game/HKH/RetopoGENrefers to this same folder. - Find the new mesh. Static Mesh names begin with SM_; Skeletal Mesh names begin with SK_. Names include _Retopo, with a unique suffix when needed. You can rename the exported asset in the Content Browser.
- Double-click the asset to inspect it in Unreal's mesh editor. For a prop, drag the new Static Mesh into a level to try it. For a character, check the Skeletal Mesh with its intended animations before assigning it to your character.
Export saves a new Unreal mesh asset. It does not overwrite your original or automatically replace meshes already used in a level or Blueprint. The Output section also shows the latest asset in Last Export or Last Skeletal Export.
This button is not an FBX/OBJ file export dialog. If you need an external file, use Unreal's available asset export options on the newly saved mesh.
What carries into the exported asset?
The new mesh keeps its source type, material slots and assignments, UV channels and original size and position relative to its origin. The preview's side-by-side spacing does not become part of the exported geometry.
Only the selected source LOD is processed. It becomes LOD 0 of the new asset. Additional LODs, mesh sockets and source Nanite settings are not copied. Set up those features on the new asset if your project needs them.
For Static Meshes, export uses the mesh surface for collision and does not copy the source's simple collision shapes. Review collision in the Static Mesh Editor before using the result in gameplay, especially for objects that need physics simulation.
Work with characters and creatures
Open a Skeletal Mesh using the same right-click shortcut. It appears in its reference pose, the resting pose used by its skeleton, rather than playing an animation.
RetopoGEN transfers UVs, materials and skin weights, including named weight profiles. Skin weights determine how strongly each bone moves each part of the mesh. The exported mesh uses the original Skeleton asset.
After export, test poses that bend the elbows, knees, shoulders, fingers and any other important joints. If bending looks worse, try a higher triangle target. A mesh can look good while standing still and still need more detail around moving joints.
Morph targets, clothing bindings and physics assets are not copied. For example, facial morph expressions or cloth simulation will need separate setup on the new mesh. Retopo LAB does not provide animation editing or skin-weight painting.
Save settings for another session
Opening a mesh from its shortcut creates a temporary session. Export any result you want to keep before closing it.
To keep a reusable set of settings:
- Right-click an empty area in the Content Browser.
- Choose HKH > HKH RetopoGEN Asset.
- Give it a useful name, such as Retopo_StoneStatue.
- Open it, choose your source, run a tool and export the result.
- Use the Editor's Save command to save this settings asset.
This asset remembers source/settings and last-export references. It does not store the working preview or UV editing session. When reopened, it loads the source automatically; loading resets the triangle targets to half the source count. Set a different target again if needed, then rerun the tool. Previously exported mesh assets remain saved independently.
Troubleshooting
| Problem | What to do |
|---|---|
| Edit in Retopo LAB... is missing | Confirm the plugin is enabled and the Editor was restarted. Right-click exactly one Static Mesh or Skeletal Mesh in the Content Browser. The shortcut is not a level-viewport action. |
| The source will not load | Read the Processing message. Check that the selected LOD exists, contains editable mesh data and has no more than 2,000,000 triangles. For a character, check that it has a valid Skeleton. If mesh data is missing, reimport the original model into Unreal. |
| My source has more than 2 million triangles | Choose an existing source LOD under the limit, or prepare a smaller source mesh before opening it. Lowering Target Triangles does not change the source-loading limit. |
| The source has holes | Openings alone do not prevent loading. Leave them open if intentional. If loading fails, use the specific Processing message to identify the cause. |
| The model is outside the preview | Click Frame. |
| Buttons are disabled | Wait for source loading or processing to finish. A retopology tool needs a loaded source; export needs a current result. |
| Inspector settings are disabled | Close the UV Editor tab. Resolve any pending UV-change prompt first. |
| Export became disabled after changing a value | Run the selected retopology tool again. The old preview is no longer current for the changed settings. |
| The result did not reach Target Triangles | Check the target section for your chosen tool. Many separate parts or protected edges can limit reduction. Try Optimize, adjust its protections carefully, or accept a higher count. |
| Some faces are still triangles | Difficult regions may retain triangles. Check Generated quads and the actual triangle count. RetopoGEN does not guarantee every face will become a quad. |
| A deviation warning appears | Inspect the shape and try a higher target. AutoRemesh Quads keeps a usable result when its distance goal is missed. The two triangle tools may reject a result beyond their Constraints limit. |
| Textures look stretched or materials bleed across a border | Try a higher target. Inspect the UVs and material boundaries. Avoid automatically repacking UVs if you need to keep an existing painted texture aligned. |
| UV changes did not appear in the result | Accept the active UV tool, then click Apply. Export afterward to save the edited mesh. |
| Opening or exporting a dense mesh takes time | Wait for the Processing message; preparing and saving large assets can pause the Editor. An existing lower-detail source LOD can reduce the amount of work. |
| I cannot find the exported asset | Open Content > HKH > RetopoGEN and check the saved path in Processing or the reference under Output. Export does not place the new mesh into your level. |
| I closed the window and the preview is gone | Reopen the source and run the tool again. A working preview is temporary; only Export Result Mesh saves a mesh asset. |